📌 스프링부트 도메인 사용 배포
스프링부트에서 도메인(DNS)을 사용하려면,
JAR 빌드 방식이 아닌 WAR 빌드 방식으로 배포해야 합니다.
WAR 파일은 웹 애플리케이션 아카이브로, Tomcat과 같은 서블릿 컨테이너에 배포하기에 적합합니다.
도메인 설정을 하려면 반드시 WAR로 빌드해야 합니다.
JAR는 간편하지만 도메인 연결에 한계가 있으며, WAR는 웹 서버와 통합하여 도메인 설정이 가능합니다.
🔎 JAR, WAR 차이
JAR 파일
- 스프링 부트 애플리케이션을 독립적으로 실행
- 내장 톰캣 서버 사용
- 도메인 설정이 어렵고, 주로 개발 및 테스트에 적합
WAR 파일
- 전통적인 웹 애플리케이션 배포 형식
- 외부 웹 서버(Nginx, Apache 등)에서 실행
- 여러 도메인을 쉽게 관리하고 설정할 수 있음
📌 Maven을 이용한 WAR 빌드 (STS)
Maven으로 Spring Boot 프로젝트를 WAR 파일로 패키징하여
Tomcat 서버에 배포할 수 있도록 설정하고 빌드하는 과정입니다.
✅ pom.xml 설정 (Maven 설정)
1. WAR 파일 생성 설정
WAR 파일을 생성하기 위해 pom.xml 파일에 다음과 같은 설정을 추가합니다.
<packaging>war</packaging>// ▶ ⚙️pom.xml
<groupId>com.nara</groupId>
<artifactId>nara</artifactId>
<version>0.0.1-SNAPSHOT</version>
<name>nara</name>
<description>Demo project for Spring Boot</description>
<!-- WAR 배포 형식 지정 -->
<packaging>war</packaging>
<url/>
2. Dependency 추가
WAR 배포를 위해 spring-boot-starter-web 의존성을 추가합니다.
이때, 컴파일 단계에서만 Tomcat 라이브러리를 사용하도록 scope를 provided로 지정합니다.
이는 배포 후 내장 Tomcat이 아닌 이미 존재하는 Tomcat 서버를 이용하기 위함입니다.
<scope>provided</scope>// ▶ ⚙️pom.xml
<dependency>
<groupId>org.springframework.boot</groupId>
<artifactId>spring-boot-starter-web</artifactId>
<!-- 배포 이후 내장 Tomcat이 아닌 이미 존재하는 Tomcat 서버를 이용 -->
<scope>provided</scope>
</dependency>
✅ Spring Boot Application 클래스 설정
프로젝트에서 main 메소드가 존재하는 클래스로, Spring Boot 애플리케이션을 시작하는 역할
이 클래스에는 @SpringBootApplication 어노테이션이 지정되어 있습니다.
다음과 같이 SpringBootServletInitializer를 상속받고,
configure 메소드를 오버라이드하여 WAR 배포를 위한 설정을 추가합니다.
메소드 내의 클래스명은 작업 중인 프로젝트마다 다를 수 있습니다.
// ▶ ⚙️nara/src/main/java/com/nara/NaraApplication.java
package com.nara;

import org.springframework.boot.SpringApplication;
import org.springframework.boot.autoconfigure.SpringBootApplication;
import org.springframework.boot.builder.SpringApplicationBuilder;
import org.springframework.boot.web.servlet.support.SpringBootServletInitializer;

@SpringBootApplication
public class NaraApplication extends SpringBootServletInitializer {

	// war 배포를 위한 소스
	@Override
	protected SpringApplicationBuilder configure(SpringApplicationBuilder builder) {
		return builder.sources(NaraApplication.class);
	}

	public static void main(String[] args) {
		SpringApplication.run(NaraApplication.class, args);
	}

}
✅ WAR 파일 빌드
Maven을 사용하여 WAR 파일을 빌드합니다.
1. '프로젝트 우클릭' ▶ 'Run As' ▶ 'Maven build...' 클릭
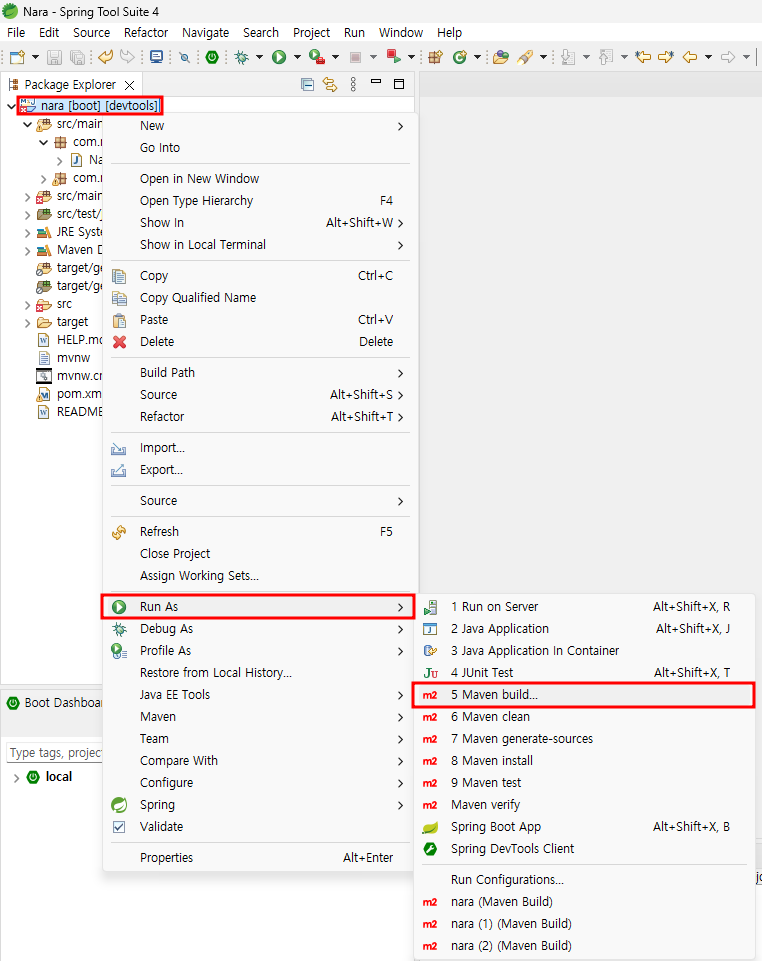
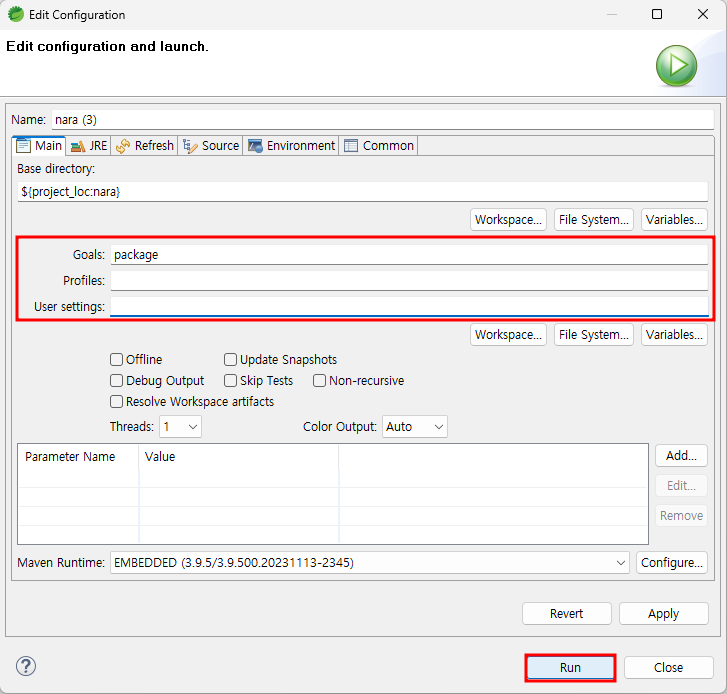
2. Goals ▶ 'package' 입력 / Profiles ▶ 'pom.xml' 삭제
Run 버튼을 클릭하여 빌드 과정을 시작합니다.
3. WAR 파일 확인
빌드가 완료되면 콘솔에 BUILD SUCCESS 메시지가 표시됩니다.
프로젝트 폴더 내의 target 폴더에 WAR 파일이 생성되어 있습니다.
이 WAR 파일을 Tomcat에 배포합니다.


📌 Tomcat 서버 WAR 배포
Tomcat 서버에 WAR 파일을 배포하고 기본 애플리케이션으로 설정한 후,
도메인 및 서버 기동을 통해 프로젝트에 접근할 수 있도록 설정하는 과정입니다.
✅ Tomcat 설치
https://tomcat.apache.org/download-11.cgi
Apache Tomcat® - Apache Tomcat 11 Software Downloads
Welcome to the Apache Tomcat® 11.x software download page. This page provides download links for obtaining the latest version of Tomcat 11.0.x software, as well as links to the archives of older releases. Unsure which version you need? Specification versi
tomcat.apache.org

✅ WAR 파일 Tomcat에 배포
Apache Tomcat의 apache-tomcat-11.0.0/webapps 폴더에 WAR 파일을 배포합니다.
Tomcat은 별도의 설정 없이 webapps 내의 ROOT 폴더를 기본으로 실행하므로
파일명을 ROOT로 설정하면 별도의 설정이 필요 없습니다.
- WAR 파일명 ➡️ 📄ROOT.war 변경
- 생성된 폴더명 ➡️ 🗂️ROOT 변경
※ 별도의 설정 없이 사용하려면 아래와 같이 하면 된다.
- 📂 nara-0.0.1-SNAPSHOT ➡️ 📂 ROOT
- 📄 nara-0.0.1-SNAPSHOT.war ➡️ 📄 ROOT.war


예를 들어, WAR 파일이 빌드될 때 위와 같이 추출되고, 해당 폴더명과 파일을 사용하고 싶다면
apache-tomcat-11.0.0/conf/server.xml 파일을 수정해야 합니다.
// ▶ ⚙️apache-tomcat-11.0.0/conf/server.xml
<!-- 기본 localhost 호스트 -->
<Host name="localhost" appBase="webapps" unpackWARs="true" autoDeploy="true">
<!-- <Context path="[경로]" docBase="[war파일의 이름]" reloadable="false" > </Context> -->
<Context path="" docBase="ROOT" reloadable="false" />
<!-- <Context path="" docBase="nara-0.0.1-SNAPSHOT" reloadable="false" /> -->
<Valve className="org.apache.catalina.valves.AccessLogValve" directory="logs"
prefix="localhost_access_log" suffix=".txt"
pattern="%h %l %u %t "%r" %s %b" />
</Host>
✅ Tomcat 도메인(DNS) 설정
Tomcat에서 도메인(DNS) 설정을 하려면, 먼저 DNS 사이트를 이용해 공식 도메인을 등록한 후,
apache-tomcat-11.0.0/conf/server.xml 파일에 서브 도메인에 연결될 호스트를 추가해야 합니다.
예를 들어, 다음과 같은 코드를 추가하여 www.naracredit.com 도메인으로 접근 시
ROOT 애플리케이션이 실행되도록 설정할 수 있습니다.
// ▶ ⚙️apache-tomcat-11.0.0/conf/server.xml
<!-- 서브 도메인에 연결될 호스트 추가 -->
<Host name="www.naracredit.com" appBase="webapps" unpackWARs="true" autoDeploy="true">
  <Context path="" docBase="ROOT"  reloadable="false" />
</Host>
사용예시
// ▶ ⚙️apache-tomcat-11.0.0/conf/server.xml
<?xml version="1.0" encoding="UTF-8"?>
<!--
Licensed to the Apache Software Foundation (ASF) under one or more
contributor license agreements. See the NOTICE file distributed with
this work for additional information regarding copyright ownership.
The ASF licenses this file to You under the Apache License, Version 2.0
(the "License"); you may not use this file except in compliance with
the License. You may obtain a copy of the License at
http://www.apache.org/licenses/LICENSE-2.0
Unless required by applicable law or agreed to in writing, software
distributed under the License is distributed on an "AS IS" BASIS,
WITHOUT WARRANTIES OR CONDITIONS OF ANY KIND, either express or implied.
See the License for the specific language governing permissions and
limitations under the License.
-->
<!-- Note: A "Server" is not itself a "Container", so you may not
define subcomponents such as "Valves" at this level.
Documentation at /docs/config/server.html
-->
<Server port="8005" shutdown="SHUTDOWN">
<Listener className="org.apache.catalina.startup.VersionLoggerListener" />
<!-- Security listener. Documentation at /docs/config/listeners.html
<Listener className="org.apache.catalina.security.SecurityListener" />
-->
<!-- OpenSSL support using Tomcat Native -->
<Listener className="org.apache.catalina.core.AprLifecycleListener" />
<!-- OpenSSL support using FFM API from Java 22 -->
<!-- <Listener className="org.apache.catalina.core.OpenSSLLifecycleListener" /> -->
<!-- Prevent memory leaks due to use of particular java/javax APIs-->
<Listener className="org.apache.catalina.core.JreMemoryLeakPreventionListener" />
<Listener className="org.apache.catalina.mbeans.GlobalResourcesLifecycleListener" />
<Listener className="org.apache.catalina.core.ThreadLocalLeakPreventionListener" />
<!-- Global JNDI resources
Documentation at /docs/jndi-resources-howto.html
-->
<GlobalNamingResources>
<!-- Editable user database that can also be used by
UserDatabaseRealm to authenticate users
-->
<Resource name="UserDatabase" auth="Container"
type="org.apache.catalina.UserDatabase"
description="User database that can be updated and saved"
factory="org.apache.catalina.users.MemoryUserDatabaseFactory"
pathname="conf/tomcat-users.xml" />
</GlobalNamingResources>
<!-- A "Service" is a collection of one or more "Connectors" that share
a single "Container" Note: A "Service" is not itself a "Container",
so you may not define subcomponents such as "Valves" at this level.
Documentation at /docs/config/service.html
-->
<Service name="Catalina">
<!--The connectors can use a shared executor, you can define one or more named thread pools-->
<!--
<Executor name="tomcatThreadPool" namePrefix="catalina-exec-"
maxThreads="150" minSpareThreads="4"/>
-->
<!-- A "Connector" represents an endpoint by which requests are received
and responses are returned. Documentation at :
HTTP Connector: /docs/config/http.html
AJP Connector: /docs/config/ajp.html
Define a non-SSL/TLS HTTP/1.1 Connector on port 8080
-->
<Connector port="8080" protocol="HTTP/1.1"
connectionTimeout="20000"
redirectPort="8443"
URIEncoding="UTF-8" />
<!-- A "Connector" using the shared thread pool-->
<!--
<Connector executor="tomcatThreadPool"
port="8080" protocol="HTTP/1.1"
connectionTimeout="20000"
redirectPort="8443" />
-->
<!-- Define an SSL/TLS HTTP/1.1 Connector on port 8443 with HTTP/2
This connector uses the NIO implementation. The default
SSLImplementation will depend on the presence of the APR/native
library and the useOpenSSL attribute of the AprLifecycleListener.
Either JSSE or OpenSSL style configuration may be used regardless of
the SSLImplementation selected. JSSE style configuration is used below.
-->
<!--
<Connector port="8443" protocol="org.apache.coyote.http11.Http11NioProtocol"
maxThreads="150" SSLEnabled="true">
<UpgradeProtocol className="org.apache.coyote.http2.Http2Protocol" />
<SSLHostConfig>
<Certificate certificateKeystoreFile="conf/localhost-rsa.jks"
certificateKeystorePassword="changeit" type="RSA" />
</SSLHostConfig>
</Connector>
-->
<!-- Define an AJP 1.3 Connector on port 8009 -->
<!--
<Connector protocol="AJP/1.3"
address="::1"
port="8009"
redirectPort="8443" />
-->
<!-- An Engine represents the entry point (within Catalina) that processes
every request. The Engine implementation for Tomcat stand alone
analyzes the HTTP headers included with the request, and passes them
on to the appropriate Host (virtual host).
Documentation at /docs/config/engine.html -->
<!-- You should set jvmRoute to support load-balancing via AJP ie :
<Engine name="Catalina" defaultHost="localhost" jvmRoute="jvm1">
-->
<Engine name="Catalina" defaultHost="localhost">
<!--For clustering, please take a look at documentation at:
/docs/cluster-howto.html (simple how to)
/docs/config/cluster.html (reference documentation) -->
<!--
<Cluster className="org.apache.catalina.ha.tcp.SimpleTcpCluster"/>
-->
<!-- Use the LockOutRealm to prevent attempts to guess user passwords
via a brute-force attack -->
<Realm className="org.apache.catalina.realm.LockOutRealm">
<!-- This Realm uses the UserDatabase configured in the global JNDI
resources under the key "UserDatabase". Any edits
that are performed against this UserDatabase are immediately
available for use by the Realm. -->
<Realm className="org.apache.catalina.realm.UserDatabaseRealm"
resourceName="UserDatabase"/>
</Realm>
<!-- 기본 localhost 호스트 -->
<Host name="localhost" appBase="webapps" unpackWARs="true" autoDeploy="true">
<!-- <Context path="[경로]" docBase="[war파일의 이름]" reloadable="false" > </Context> -->
<Context path="" docBase="ROOT" reloadable="false" />
<!-- <Context path="" docBase="nara-0.0.1-SNAPSHOT" reloadable="false" /> -->
<!-- SingleSignOn valve, share authentication between web applications
Documentation at: /docs/config/valve.html -->
<!--
<Valve className="org.apache.catalina.authenticator.SingleSignOn" />
-->
<!-- Access log processes all example.
Documentation at: /docs/config/valve.html
Note: The pattern used is equivalent to using pattern="common" -->
<Valve className="org.apache.catalina.valves.AccessLogValve" directory="logs"
prefix="localhost_access_log" suffix=".txt"
pattern="%h %l %u %t "%r" %s %b" />
</Host>
<!-- 서브 도메인에 연결될 호스트 추가 -->
<Host name="www.naracredit.com" appBase="webapps" unpackWARs="true" autoDeploy="true">
<Context path="" docBase="ROOT" reloadable="false" />
</Host>
</Engine>
</Service>
</Server>
✅ Tomcat 서버 기동
🔎 Tomcat 서버 시작
Tomcat 서버를 배포하려면 apache-tomcat-11.0.0/bin 경로에 있는 startup.bat 파일을 실행합니다.
Linux나 Mac 환경에서는 startup.sh를 실행합니다.
🔎 Tomcat 서버 자동 기동
해당 파일을 실행하면, Tomcat이 WAR 파일을 자동으로 풀어주고 서버를 기동합니다.
WAR 파일이 webapps 폴더에 있을 경우, Tomcat이 이를 읽어 애플리케이션을 자동으로 배포합니다.
🔎 Tomcat 서버 종료
서버를 종료하려면 동일한 경로에 있는 shutdown.bat 파일을 실행합니다.
Linux나 Mac 환경에서는 shutdown.sh를 실행합니다.

➕ 프로젝트 접근 및 context path 설정
🔎 기본 접근
서버가 정상적으로 실행되면
웹 브라우저의 주소창에 http://localhost:포트번호를 입력하여 프로젝트에 접근할 수 있습니다.
기본 포트는 8080이지만, 다른 포트로 설정되었을 경우 해당 포트를 입력해야 합니다.
🔎 context path 설정
만약 context path가 제대로 인식되지 않는 경우,
http://localhost:포트번호/프로젝트명 으로 접근해야 할 수도 있습니다.
이때 application.properties 또는 application.yml 파일에서 context path가 "/"로 설정되어 있는지 확인합니다.
context path는 공백("")으로 설정되어야 루트 경로로 정상적으로 작동합니다.
# application.properties 예시
server.servlet.context-path=/
➕ 포트 번호 충돌 시 해결 방법
🔎 포트 충돌 발생
기본 포트인 8080번이 다른 애플리케이션에서 사용 중일 경우,
Tomcat이 실행되지 않거나 에러가 발생할 수 있습니다. 이때는 Tomcat의 기본 포트를 변경해야 합니다.
🔎 포트 변경 방법
apache-tomcat-11.0.0/conf/server.xml 파일에서
Connector 태그의 포트 번호를 원하는 번호로 변경합니다.
<Connector port="8081" protocol="HTTP/1.1"
           connectionTimeout="20000"
           redirectPort="8443" />
'📌 Back End > └ Spring Boot' 카테고리의 다른 글
| [Spring Boot] 스프링부트 Select a wizard에 jsp 검색 해결 방법 (0) | 2024.09.27 |
|---|---|
| [JSP] <jsp:include> 액션 태그를 이용한 레이아웃 템플릿 (0) | 2024.05.16 |
| [Spring Boot] 컨트롤러 클래스 없이 특정 view대한 컨트롤러 추가 WebMvcConfigurer addViewControllers (1) | 2024.05.16 |
| [Spring Boot] webjars 사용하기 (bootstrap 의존성 추가) (0) | 2024.04.30 |
| [Spring Boot] 스프링부트 프로젝트 생성(STS) / 빌드 / 실행 (1) | 2024.04.30 |


